Articles
Constructing a darkroom
08/04/2021
Moving my darkroom from the loft to the garage.
The Darkroom
The darkroom is not only a sanctuary but it is a place of solitude, and is also the creative heart of any analogue photographer.
Over the years I have worked in a number of darkrooms, from early cramped set-ups in stair cupboards, to using temporary bathrooms, right through to professional spaces and palatial communal facilities. My current space was built for me in 2010 and replaced the darkroom that I had built myself into our loft over 40yrs ago.
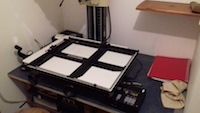
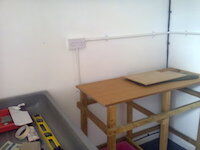
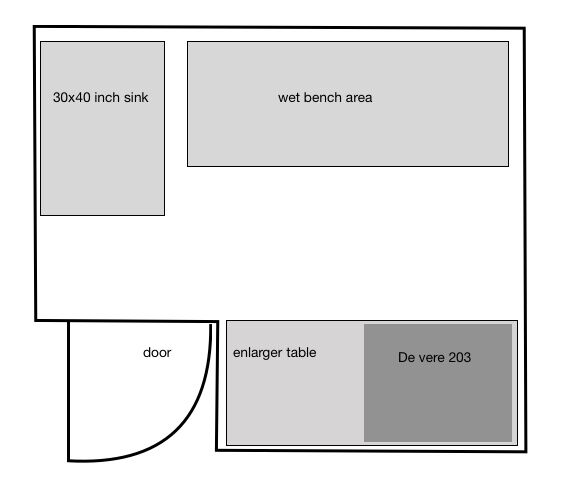
My original darkroom in the loft space of our house was not ideal and not a comfortable place to work in throughout the year, it could be too warm in the summer and extremely cold in the winter. My need for a darkroom space that I could work in throughout the year made me relocate and use an area of my garage. Where I have created a 9x7 square foot working area, which has a decent sized wet bench area that can accommodate 3x16x20 trays, alongside a 30x40inch sink. Opposite to the wet side there is a small dry bench area and an alcove where my De Vere 203 enlarger sits. All the walls and ceiling where made from stud partition, covered in plaster board and skimmed with plaster by a professional builder. The room is well insulated and includes a slightly raised floor, all making it a good workable environment all year round. The benches where recycled and reassembled using the wood from the previous darkroom. Although it is not a large area, and certainly only large enough for one person to work comfortably in I find it sufficient for my printing needs.
The pictures show various stages of the construction, illustrating both wet and dry benches along with the enlarger area. The De Vere 203 dichromat enlarger is controlled by a RH Stop clock timer.


The darkroom is not only a sanctuary but it is a place of solitude, and is also the creative heart of any analogue photographer.
Over the years I have worked in a number of darkrooms, from early cramped set-ups in stair cupboards, to using temporary bathrooms, right through to professional spaces and palatial communal facilities. My current space was built for me in 2010 and replaced the darkroom that I had built myself into our loft over 40yrs ago.
My original darkroom in the loft space of our house was not ideal and not a comfortable place to work in throughout the year, it could be too warm in the summer and extremely cold in the winter. My need for a darkroom space that I could work in throughout the year made me relocate and use an area of my garage. Where I have created a 9x7 square foot working area, which has a decent sized wet bench area that can accommodate 3x16x20 trays, alongside a 30x40inch sink. Opposite to the wet side there is a small dry bench area and an alcove where my De Vere 203 enlarger sits. All the walls and ceiling where made from stud partition, covered in plaster board and skimmed with plaster by a professional builder. The room is well insulated and includes a slightly raised floor, all making it a good workable environment all year round. The benches where recycled and reassembled using the wood from the previous darkroom. Although it is not a large area, and certainly only large enough for one person to work comfortably in I find it sufficient for my printing needs.
The pictures show various stages of the construction, illustrating both wet and dry benches along with the enlarger area. The De Vere 203 dichromat enlarger is controlled by a RH Stop clock timer.